


Contents
- 1 Create a New Page and Enable the Divi Builder
- 2 Add a New Section with a Four-Column Row
- 3 Add a Text Module to Each Column with a Number and a Title for Each Step
- 4 Add Custom CSS Classes and IDs to the Text Modules
- 5 Add a Divider Module Below the Row and Customize its Settings
- 6 Add Custom CSS Code to Style The Timeline
- 7 Add Dynamic WooCommerce Modules to Display the Cart Contents, Totals, and Cross-Sells
- 8 Save and Preview the Page
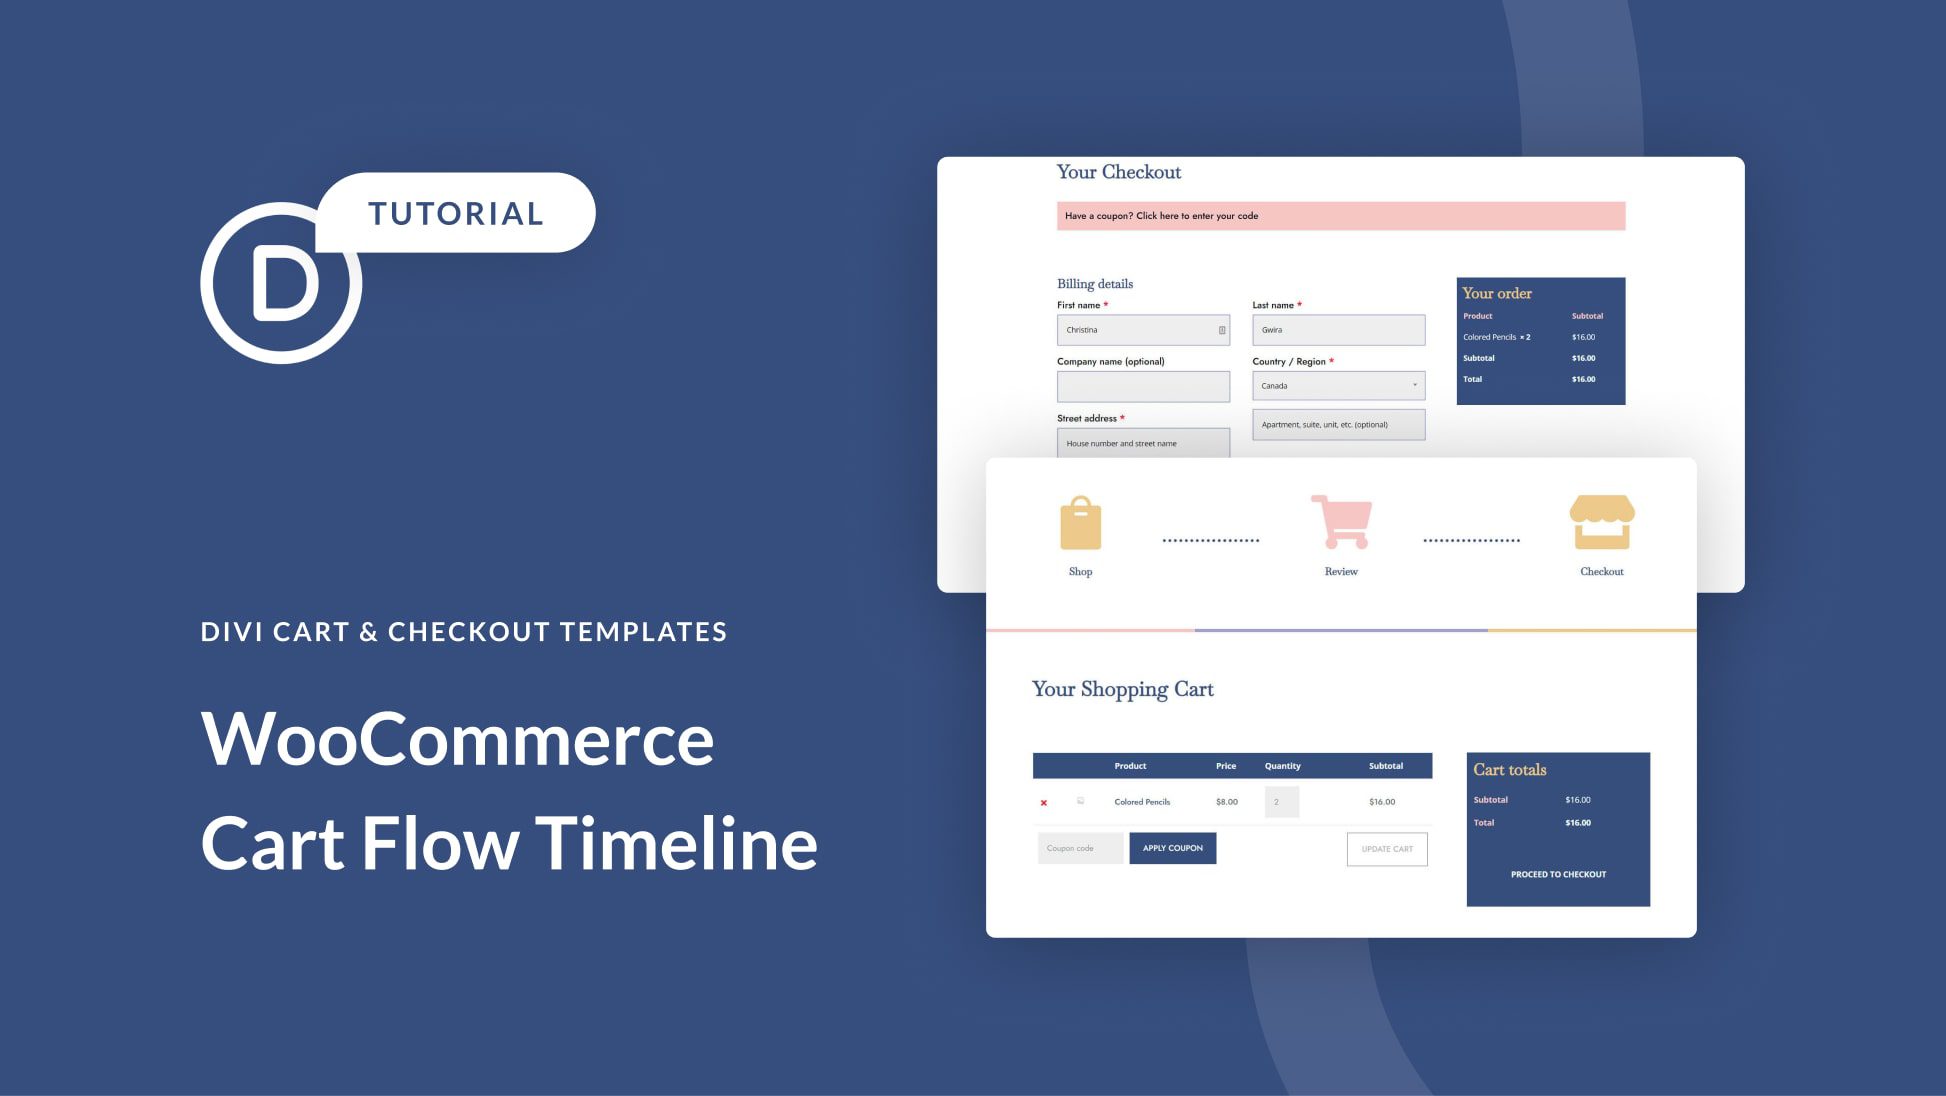
If you are using WooCommerce and Divi for your online store, you might want to create a cart flow timeline that shows your customers the steps they need to take to complete their purchase. A cart flow timeline can help improve the user experience and increase conversions by providing clear guidance and feedback.
In this tutorial, we will show you how to make a WooCommerce cart flow timeline with Divi using the following steps:
- Create a new page and enable the Divi Builder
- Add a new section with a four-column row
- Add a text module to each column with a number and a title for each step
- Add custom CSS classes and IDs to the text modules
- Add a divider module below the row and customize its settings
- Add custom CSS code to style the timeline
- Add dynamic WooCommerce modules to display the cart contents, totals, and cross-sells
- Save and preview the page
Let’s get started!
Create a New Page and Enable the Divi Builder
The first step is to create a new page for your cart flow timeline. You can do this by going to Pages > Add New in your WordPress dashboard. Give your page a title and then click on Use The Divi Builder.
Add a New Section with a Four-Column Row
Next, you need to add a new section with a four-column row where you will place your text modules for the timeline steps. To do this, click on the plus icon at the bottom of the page and select Regular Section. Then choose the four-column layout from the options.
Add a Text Module to Each Column with a Number and a Title for Each Step
Now, you need to add a text module to each column with a number and a title for each step of the cart flow. To do this, click on the plus icon inside each column and select Text Module from the list of modules.
In the first column, enter “1” as the text content and then go to the Design tab. Under Text Settings, change the text color to white, the text size to 36px, and the text alignment to center. Then go to the Spacing settings and add 10px of top margin.
In the second column, enter “Cart” as the text content and then go to the Design tab. Under Text Settings, change the text color to white, the text size to 18px, and the text alignment to center. Then go to the Spacing settings and add 20px of top margin.
Repeat these steps for the third and fourth columns, but enter “Checkout” and “Order Complete” as the text content respectively.
Add Custom CSS Classes and IDs to the Text Modules
Next, you need to add some custom CSS classes and IDs to the text modules so that you can style them later with custom CSS code. To do this, go to each text module’s Advanced tab and enter “cart-flow-number” as the CSS class for the modules with numbers and “cart-flow-title” as the CSS class for the modules with titles.
Then, enter “cart-flow-step-1” as the CSS ID for both modules in the first column, “cart-flow-step-2” as the CSS ID for both modules in the second column, “cart-flow-step-3” as the CSS ID for both modules in the third column, and “cart-flow-step-4” as the CSS ID for both modules in the fourth column.
Add a Divider Module Below the Row and Customize its Settings
Now, you need to add a divider module below the row that will act as the line connecting the steps of the timeline. To do this, click on the plus icon below the row and select Divider Module from
the list of modules.
Then go to its Content tab and disable Show Divider. Then go to its Design tab and change its height to 4px. Then go to its Spacing settings and add 10px of top margin.
Add Custom CSS Code to Style The Timeline
Next, you need to add some custom CSS code that will style your timeline according to your preferences. To do this, go to your page settings by clicking on the purple icon at the bottom of the page. Then go to its Advanced tab and enter the following code in the Custom CSS box:
/* Change background color of active step */ .cart-flow-step-2 .cart-flow-number, .cart-flow-step-2 .cart-flow-title { background-color: #00a0d2; }
/* Change background color of completed step */ .cart-flow-step-1 .cart-flow-number, .cart-flow-step-1 .cart-flow-title { background-color: #6ebd45; }
/* Change background color of future step */ .cart-flow-step-3 .cart-flow-number, .cart-flow-step-3 .cart-flow-title, .cart-flow-step-4 .cart-flow-number, .cart-flow-step-4 .cart-flow-title { background-color: #eeeeee; }
/* Add border radius to text modules */ .cart-flow-number, .cart-flow-title { border-radius: 50%; }
/* Add padding to text modules */ .cart-flow-number { padding: 15px; }
.cart-flow-title { padding: 10px; }
/* Add box shadow to text modules */ .cart-flow-number, .cart-flow-title { box-shadow: 0px 2px 5px rgba(0,0,0,0.1); }
/* Change color of divider line */ .et_pb_divider_0 { background-color: #eeeeee; }
/* Add pseudo elements to divider line */ .et_pb_divider_0:before, .et_pb_divider_0:after { content: “”; position: absolute; top: -2px; width: calc(25% – 30px); height: 4px; }
/* Change color of pseudo elements */ .et_pb_divider_0:before { left: 15px; background-color: #6ebd45; }
.et_pb_divider_0:after { right: 15px; background-color: #00a0d2; }
Add Dynamic WooCommerce Modules to Display the Cart Contents, Totals, and Cross-Sells
The last step is to add some dynamic WooCommerce modules that will display the cart contents, totals, and cross-sells on your cart page. To do this, add a new section below the previous one with a two-column row.
In the left column, add a Woo Cart Products module and customize its settings as you like. This module will show the products that the customer has added to their cart and allow them to update or remove them.
In the right column, add a Woo Cart Totals module and customize its settings as you like. This module will show the subtotal, shipping, taxes, and total amount of the cart and allow the customer to proceed to checkout.
Below the row, add a Woo Cart Cross Sells module and customize its settings as you like. This module will show some products that are related to the ones in the cart and encourage the customer to buy more.
Save and Preview the Page
That’s it! You have successfully created a WooCommerce cart flow timeline with Divi. Now you can save and preview your page and see how it looks on different devices. You can also tweak the design and functionality of your timeline as you wish.
We hope you enjoyed this tutorial and learned something new. Feel free to share your feedback or questions in the comments below.


Recent Comments